Online Ogre Battle Instructions |
|||||||||||||||||||||||
|
|
|||||||||||||||||||||||
|
So, you've seen me go on & on in various sections of this site about how to do certain things, but some of you out there may not have any idea what button does what! That's where this comes in... This is an attempt to be instructions for this game. With little twists of my personality sprinkled in of course!! I will leave out the last section that was in the SNES instructions, but it only tells you how to beat the first five or so stages. I have those up elsewhere on this site in the walkthrough section, and so there’s no sense in repeating it, especially since mine is better than this one was! |
|||||||||||||||||||||||
|
|
|||||||||||||||||||||||
|
|
|||||||||||||||||||||||
|
|
|||||||||||||||||||||||
|
|
|||||||||||||||||||||||
|
The days of Zenobia are growing dark and cold -- evil is running rampant over the entire continent. Shadows of men roam the streets, whispering of the demise of their great king. The trusted Sage Rashidi fell prey to the evils of power, and in its grip, Rashidi slew Gran, the mighty King. Rashidi then joined forces with Empress Endora, and their reign of terror spread to the entire continent. Thus, the Zeteginean Empire was born. |
|||||||||||||||||||||||
|
Your Mission Jim, should you choose to accept it... |
|||||||||||||||||||||||
|
It’s been nearly a quarter of a century since the reign of terror began. The Empire rules with neither justice nor compassion. The last remaining members of the rebellion are gathering on the outskirts of Sharom. The rebellion is greatly outnumbered by the evil power. However, secrets carried through the wind tell of a great Wizard named “Warren,” who may be willing to help you. Choose your path wisely, listen carefully to the people, and gain their confidence. If you are not careful, all will have been in vain. You will have toppled an evil Empire, only to start one of your own. |
|||||||||||||||||||||||
|
|
|||||||||||||||||||||||
|
|
|||||||||||||||||||||||
|
All you have to do is rinse & repeat these steps, and you're on your way to victory! |
|||||||||||||||||||||||
|
1) Choose Location: |
|||||||||||||||||||||||
|
2) Deploy Units: |
|||||||||||||||||||||||
|
3) Defeat Enemy Units: |
|||||||||||||||||||||||
|
4) Liberate Towns: |
|||||||||||||||||||||||
|
5) Beat the Boss: |
|||||||||||||||||||||||
|
|
|||||||||||||||||||||||
|
|
|||||||||||||||||||||||
|
1) Let’s Make a Hero: |
|||||||||||||||||||||||
|
2) Choose the First Location: |
|||||||||||||||||||||||
|
|
|||||||||||||||||||||||
|
|
|||||||||||||||||||||||
|
The main objective of every stage is to liberate the boss castle, but sending a unit straight there all on his lonesome is not the best way to achieve this. You need to liberate cities along the way to provide your troops with resting points and outposts for recharging themselves, not to mention gathering valuable information about the region. So, follow these steps to prepare for the final siege. |
|||||||||||||||||||||||
|
1) Move Your Units: |
|||||||||||||||||||||||
|
2) Liberate Cities: |
|||||||||||||||||||||||
|
After liberating a town or Roshian Temple, you will have the chance to pull a Tarot Card. Depending upon the card drawn, the unit will get certain stat alterations. Check the Tarot Card section to find out which ones give you what. Some towns 7 temples give out free goodies after they are liberated. Keep an eye out for such generous places! |
|||||||||||||||||||||||
|
3) Discovering Hidden Cities: |
|||||||||||||||||||||||
|
4) Beat the Boss!: |
|||||||||||||||||||||||
|
|
|||||||||||||||||||||||
|
|
|||||||||||||||||||||||
|
Since you have no real control over the units themselves in battle, how you have each unit organized is very important. Once you are in the “EDIT UNITS” screen, there is a list of things you can do: |
|||||||||||||||||||||||
|
|
|||||||||||||||||||||||
|
|
|||||||||||||||||||||||
|
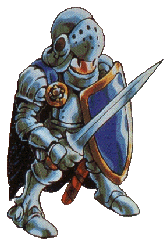
Move the cursor over to the unit that you would like to look at, and hit the confirm button. You can look at all of the individual characters within the unit you have selected. |
|||||||||||||||||||||||
|
|
|||||||||||||||||||||||
|
If you have a unit with an unoccupied space in it, you can select this icon to add a character to the unit. Also, to create a new unit, select this option, but instead of choosing a unit that already exists, select a character from your reserves that is eligible to be a leader. |
|||||||||||||||||||||||
|
|
|||||||||||||||||||||||
|
You can remove a character from an existing unit by using this command. Merely select the unit, then select the character within that unit you wish to remove. The character is then placed into your reserves. |
|||||||||||||||||||||||
|
|
|||||||||||||||||||||||
|
This command will allow you to change the positions of the characters within a unit. You can move characters from the Front Row to the Back Row. This allows you to optimize the attacks of the characters within the unit. |
|||||||||||||||||||||||
|
|
|||||||||||||||||||||||
|
Be very careful with this one! It will permanently remove a character from the game! Make sure that you know what you are doing when using this command... |
|||||||||||||||||||||||
|
|
|||||||||||||||||||||||
|
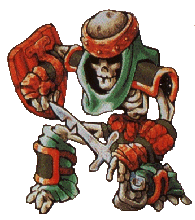
In order to make your characters stronger in battle, you will need to promote them to higher, more powerful character classes. Selecting this command will show you which characters are able to go up in their class, and by selecting a character, it will show you what classes are available. For a list of all the available character classes in this game, check out the Roll Call section. |
|||||||||||||||||||||||
|
|
|||||||||||||||||||||||
|
The leader is the character that allows the unit to move freely and provide leadership in the battlefield. if this character dies, the unit will flee back to base! You can change the leader of a unit with this command. It will show you all of the possible leaders when you select it, and allow you to pick a new one, if possible. |
|||||||||||||||||||||||
|
|
|||||||||||||||||||||||
|
There is a sub-menu for this command with more options. The full list of options will be explained below. |
|||||||||||||||||||||||
|
|
|||||||||||||||||||||||
|
|
|||||||||||||||||||||||
|
Once you have chosen the “ITEM” option, this list of options will appear for you: |
|||||||||||||||||||||||
|
|
|||||||||||||||||||||||
|
|
|||||||||||||||||||||||
|
Choose this to use an item. You can also use this command to look over the items that you have. If you press the "Select" button, or “Circle” for the PSX, it will tell you what the highlighted item does for you when you use it, or give you some background information about it. |
|||||||||||||||||||||||
|
|
|||||||||||||||||||||||
|
Weapons, armor, and other charms can be equipped with this option. To un-equip something from a character, simply select a blank space on your item list to “equip” a blank space. The original instruction book was rather sketchy on this, and this is possibly the most asked question in all of Ogre Battle! At least the PSX version added an “UNEQUIP” option! |
|||||||||||||||||||||||
|
|
|||||||||||||||||||||||
|
This is the best way to dispose of those weapons that you will never use. This is also useful when you are running out of room on your item list. You may as well get some Goth for them, eh? You can also sell other items with this command as well. |
|||||||||||||||||||||||
|
|
|||||||||||||||||||||||
|
If for some reason you want to permanently remove an item from your item list, then this is the command for you! Personally, I would much rather use the “SELL ITEM” command explained above myself, but hey, whatever. |
|||||||||||||||||||||||
|
|
|||||||||||||||||||||||
|
I don't really know what the point of this command is, to tell you the truth. It lets you swap the position of items in your item list, but if you want to move items up into empty spaces, you may as well use the “CLEAN UP” command, detailed below. I wouldn't bother with this one too much... |
|||||||||||||||||||||||
|
|
|||||||||||||||||||||||
|
This command will move up all of the items in the inventory list to fill in the empty spaces, so that you don't have gaps in between items on your list. Pretty handy to judge how many items you really have after using lost of items, or to check how close you are to running out of room on the final page of the item list. |
|||||||||||||||||||||||
|
|
|||||||||||||||||||||||
|
|
|||||||||||||||||||||||
|
When you click on a unit that has been deployed, there are three icons that will appear: |
|||||||||||||||||||||||
|
|
|||||||||||||||||||||||
|
|
|||||||||||||||||||||||
|
Click this and you will be able to move a unit to anywhere on the map. The cursor will become a flag once you have made your decision, and the unit you told to move there will begin moving to the desired location. |
|||||||||||||||||||||||
|
|
|||||||||||||||||||||||
|
This will change the tactics that this unit will use in battle. The choices are: |
|||||||||||||||||||||||
|
Best: Attack the enemy that can be hit most effectively. |
|||||||||||||||||||||||
|
Strong: Attack the opponent with the most Hit Points. |
|||||||||||||||||||||||
|
Leader: Attack the leader of the unit first. |
|||||||||||||||||||||||
|
Weak: Attack the opponent with the least Hit Points. |
|||||||||||||||||||||||
|
|
|||||||||||||||||||||||
|
Selecting this will bring up another mini-menu for you, showing you the choices of how to edit the unit while it is out in the field. This screen is nearly identical to the normal Edit Units sub-menu, except there is no Add Character or Remove Character, obviously because there are no reserves available to your units when they are deployed! |
|||||||||||||||||||||||
|
|
|||||||||||||||||||||||
|
|
|||||||||||||||||||||||
|
When you click on a unit that is stationed on a town or temple, there are three new icons that will appear in addition to the normal three: |
|||||||||||||||||||||||
|
|
|||||||||||||||||||||||
|
|
|||||||||||||||||||||||
|
This will only be available when you are visiting a town, as opposed to a Roshian Temple. You can recruit various characters to join this unit with this command. The type of characters that you can recruit is based upon what class type is currently the leader of the unit. You cannot have a new recruit join a unit if there is not have space available in the unit. |
|||||||||||||||||||||||
|
|
|||||||||||||||||||||||
|
This will only be available if you have two units occupying the same spot on the map. This will allow you to swap characters between units. Of course, you must still maintain legal units while doing this. This option is can also available get this icon out in the field as well. |
|||||||||||||||||||||||
|
|
|||||||||||||||||||||||
|
This is the only icon that is available when you are visiting a Roshian Temple. For a price, you can have one of your dead characters be revived. |
|||||||||||||||||||||||
|
|
|||||||||||||||||||||||
|
|
|||||||||||||||||||||||
World Icons |
|||||||||||||||||||||||
|
When you are on the overworld map, there are three icons for you: |
|||||||||||||||||||||||
|
|
|||||||||||||||||||||||
|
|
|||||||||||||||||||||||
|
This icon will bring you to the section about Edit Units screen, which is described above. |
|||||||||||||||||||||||
|
|
|||||||||||||||||||||||
|
Here is the place to toggle the animation, music, or sound effects on or off. You can also change the text scrolling speed and game speed. |
|||||||||||||||||||||||
|
|
|||||||||||||||||||||||
|
The most important icon in the game! This is where you save & load your game!! Your best friend. |
|||||||||||||||||||||||
Map Icons |
|||||||||||||||||||||||
|
Once you have picked a stage to battle, these are the commands available to you: |
|||||||||||||||||||||||
|
|
|||||||||||||||||||||||
|
|
|||||||||||||||||||||||
|
Here is the most important command for stages! This lets you deploy one of your units from your army onto the field. You can only have a total of 10 units deployed at a time. |
|||||||||||||||||||||||
|
|
|||||||||||||||||||||||
|
This is how you can get to the Item Icons sub menu, which is explained above. |
|||||||||||||||||||||||
|
|
|||||||||||||||||||||||
|
This icon will bring you to the Edit Units section, which is described above. |
|||||||||||||||||||||||
|
|
|||||||||||||||||||||||
|
You can look at what Tarot Cards you have with this icon. Pressing the “Select” button will tell you about them in detail. You may only have a total of 14 cards at a time. |
|||||||||||||||||||||||
|
|
|||||||||||||||||||||||
|
This shows you your projected income. At noon, you receive tribute money from each freed town, minus the cost of the units you have deployed. |
|||||||||||||||||||||||
|
|
|||||||||||||||||||||||
|
Here is the place to toggle the animation, music, or sound effects on or off. You can also change the text scrolling speed and game speed. |
|||||||||||||||||||||||
|
|
|||||||||||||||||||||||
|
This will only be available if you are revisiting a stage that you have already beaten. It will instantly return you to the main World Map. It is the only way to get back to the world map once you’re revisiting a stage, actually... |
|||||||||||||||||||||||
|
|
|||||||||||||||||||||||
|
Only in the Playstation version!!! The most important feature of the PSX version is the ability to save it while you are on a stage. What a concept!! |
|||||||||||||||||||||||
City Icons |
|||||||||||||||||||||||
|
Clicking upon an unoccupied town will provide you with the following information: |
|||||||||||||||||||||||
|
|
|||||||||||||||||||||||
|
|
|||||||||||||||||||||||
|
|
|||||||||||||||||||||||
|
When you click to halt the battle, you get four icon choices: |
|||||||||||||||||||||||
|
|
|||||||||||||||||||||||
|
|
|||||||||||||||||||||||
|
This allows you to use a Tarot Card in battle. |
|||||||||||||||||||||||
|
|
|||||||||||||||||||||||
|
Toggles the animation on or off. This can actually speed up the battles quite a bit... |
|||||||||||||||||||||||
|
|
|||||||||||||||||||||||
|
Run away!! Run away!! If you don't think you can take the heat, you can always run. However, each character in the unit will lose 1 Charisma point for showing their cowardice... |
|||||||||||||||||||||||
|
|
|||||||||||||||||||||||
|
This will change the tactics that this unit will use in battle. The choices are: |
|||||||||||||||||||||||
|
Best: Attack the enemy that can be hit most effectively. |
|||||||||||||||||||||||
|
Strong: Attack the opponent with the most Hit Points. |
|||||||||||||||||||||||
|
Leader: Attack the leader of the unit first. |
|||||||||||||||||||||||
|
Weak: Attack the opponent with the least Hit Points. |
|||||||||||||||||||||||
|
|
|||||||||||||||||||||||
|
|
|||||||||||||||||||||||
|
|
|||||||||||||||||||||||
|
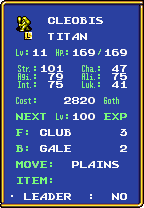
If you view the status of a character, you will get this screen: |
|||||||||||||||||||||||
|
|
|||||||||||||||||||||||
|
|
|||||||||||||||||||||||
|
|
|||||||||||||||||||||||
|
Once you have deployed all of your units all over a stage, you may sometimes lose track of where they are and where they are going at times. However, there is a simple way to find lost units. If you press the "L" button, it will give you a list of all the units that you have deployed by unit leader name. You can click on a name to center the screen right on them. If there is a boot icon next to the unit, then that means it is moving somewhere. Otherwise, it is a stationary unit. |
|||||||||||||||||||||||
|
Here is another Playstation addition. If you press the "R2" button, it will give you a list of the towns that are on a stage. It will also tell you whether you have liberated a town or not and which one has the shop. Of course, it will not show you where hidden towns are located. Can’t have everything, now can we? |
|||||||||||||||||||||||
|
|
|||||||||||||||||||||||
|
|
|||||||||||||||||||||||
|
You can do anything that you want as you play this game, but there is something that is rather important to know. There is something called Reputation, and to show how much of it you have, there is something called a Reputation Meter. |
|||||||||||||||||||||||
|
|
|||||||||||||||||||||||
|
|
|||||||||||||||||||||||
|
|
|||||||||||||||||||||||
|
|
|||||||||||||||||||||||
|
|
|||||||||||||||||||||||
|
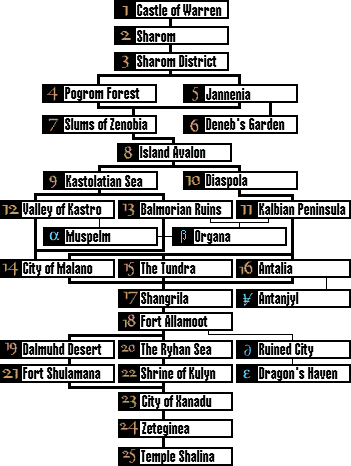
There are many ways to reach the last stage of Ogre Battle, but following the chart at the below will help you plan ahead as to which route you’d like to take. Since your Imperial enemies are stronger in each consecutive stage, it's also the best way to advance your own level. Furthermore, keep an eye out for the four hidden stages as you make your way through the game. |
|||||||||||||||||||||||
|
Special Note: The stage Dragon's Haven does appear on this map, but I do not, repeat, do not know a way to get there within the normal game... |
|||||||||||||||||||||||
|
|
|||||||||||||||||||||||
|
|
|||||||||||||||||||||||
|
|
|||||||||||||||||||||||
|
The course of Ogre Battle is as diverse and challenging as you wish to make it. With 12 different possible endings, the ending will prove to be no less unique or unpredictable! Here are some things to keep in mind if you would like a specific ending. |
|||||||||||||||||||||||
|
Check #1: Reputation Meter |
|||||||||||||||||||||||
|
Finishing the game with a full or near full Reputation Meter is just one of the many criteria in getting the very best ending. Depending on how full this meter is when you finish the game, you will get a different ending. |
|||||||||||||||||||||||
|
Check #2: Opinion Leader’s Parameters |
|||||||||||||||||||||||
|
The maximum value for Strength, Agility, & Intelligence is 255, and the maximum values for Charisma, Alignment, & Luck is 100. The most important of these stats are Charisma & Alignment, and different thresholds of these values will give you different endings. |
|||||||||||||||||||||||
|
Check #3: Important Items |
|||||||||||||||||||||||
|
Obtaining the best ending depends upon discovering all of the special treasures & items that are scattered throughout the game. Examples would include the “TABLET” (Tablet of Yaru) and the 12 Zodiac Stones. |
|||||||||||||||||||||||
|
Check #4: Recruiting Special Characters |
|||||||||||||||||||||||
|
As important as finding special items is finding and enlisting the various special characters along the way. Many key characters must join your forces in order for you to reach the best ending. |
|||||||||||||||||||||||
|
|
|||||||||||||||||||||||
|
Well, that’s all there is to the basic functions of this great strategy game. Now that you know how to control your forces and the basic ideas behind the game, do you think you can handle it? |
|||||||||||||||||||||||
|
|